
Balled head pins are one of those small jewellery components that can quietly transform a handmade design. A neatly formed ball at the end of a wire creates a clean, finished look that feels more refined than a simple cut end, and it can make earrings, dangles, and charm clusters look beautifully polished. If you enjoy making jewellery at home, learning to create professional balled head pins is a useful skill that opens up more design freedom and helps you customise your findings to suit your style.
Whether you work with minimalist gemstone drops, wrapped connectors, or elegant freshwater pearls, balled head pins offer both function and style. They hold beads securely, add a subtle decorative detail, and let you match the exact wire gauge and metal type to your project. The process does involve heat, so technique and safety matter, but with the right setup and a little practice, you can make consistent, attractive head pins right at your bench.
In this guide, we will walk through the tools you need, the step-by-step torching process, common mistakes to avoid, and practical finishing tips that can help your handmade components look more professional.
What Are Balled Head Pins?
A balled head pin is a length of metal wire with one end melted into a small rounded ball. That ball acts as a stopper so beads do not slide off the bottom. Once beads are added, the top of the wire can be turned into a simple loop, wrapped loop, or decorative finish depending on the design.
Jewellery makers often use balled head pins for:
- Dangle earrings
- Beaded charms
- Pendants with suspended accents
- Cluster necklaces
- Bracelet drops
- Rosary-style links
Compared with manufactured findings, handmade balled head pins can feel more artisanal and intentional. They are especially attractive in natural stone jewellery because they complement the organic beauty of beads without looking overly industrial.
Why Make Your Own Instead of Buying Them?
There is certainly a place for ready-made head pins, but making your own gives you much more control. If you have ever wished you had the perfect length, a slightly larger ball, or a specific wire metal that is hard to find pre-made, DIY balled head pins solve that problem.
Key advantages of homemade balled head pins
- Custom lengths: Cut each pin to suit the exact bead or design.
- Metal choice: Work with sterling silver, fine silver, copper, brass, or gold-filled wire if appropriate for torching.
- Gauge flexibility: Make delicate pins for small beads or sturdier ones for heavier drops.
- Visual consistency: Match the finish and scale to your collection.
- Artisan appeal: Handmade findings can elevate the perceived craftsmanship of a piece.
For jewellery sellers and serious hobbyists alike, mastering this technique can also streamline the creative process. Instead of designing around whatever findings are available, you can build components that fit your vision from the start.
Best Metals for Balled Head Pins
Not every wire behaves the same under a flame. Choosing the right metal is one of the biggest factors in achieving smooth, even balls at the end of your wire.
Metals commonly used
- Fine silver: Often considered the easiest metal for beginners because it balls readily and has no copper content to create firescale.
- Sterling silver: Popular and beautiful, though it requires a bit more attention because it can develop surface discolouration from heat.
- Copper: Affordable and excellent for practice. It melts into a ball nicely, though oxidation is common.
- Brass: Can work well, but it may require more practice to achieve a neat finish.
If you are just learning, copper is a practical training material before moving on to precious metals. Once your control improves, sterling silver can produce elegant, professional-looking results that pair wonderfully with amethyst beads and other gemstone accents.
Recommended wire gauges
Most jewellery makers use 20 to 24 gauge wire for balled head pins. Thinner wire creates smaller, lighter dangles, while thicker wire produces stronger pins and larger balls. As a general rule:
- 24 gauge: delicate beads and light charms
- 22 gauge: versatile everyday choice
- 20 gauge: stronger support for heavier beads
Very thick wire can be more difficult to ball neatly, while very thin wire may melt too quickly if overheated.
Tools and Supplies You Will Need
Before you begin, set up a safe, organised work area. Torching small wire ends is a straightforward process, but preparation matters.
Basic tool list
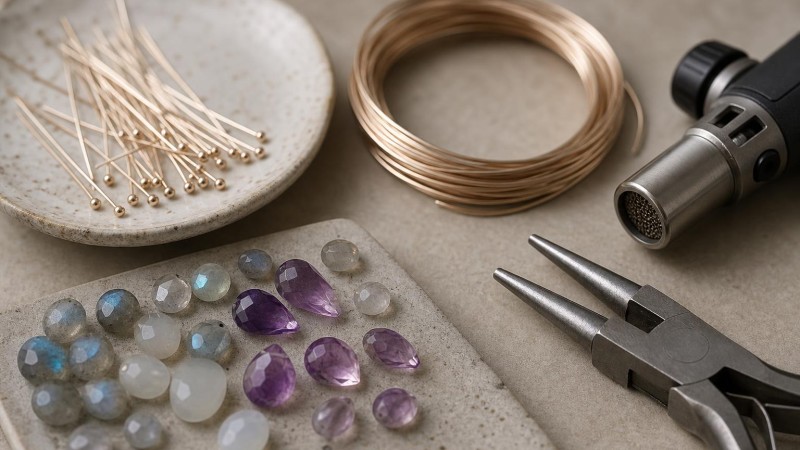
- Jewellery wire in your chosen metal and gauge
- Micro torch or butane torch
- Flush cutters
- Cross-lock tweezers or soldering tweezers
- Soldering block or heat-safe surface
- Pickle solution or appropriate cleaning method for your metal
- Brass brush or soft polishing tools
- Cup bur or wire rounder
- Safety glasses
- Heat-resistant workspace ventilation
Some makers also keep a small bowl of water nearby for quenching, though you should always use quenching practices suitable for the specific metal you are working with. A bench block and file may also be useful when preparing wire lengths and refining the finished component.
If you already make linked designs with wire wrappers or hand-formed loops, many of these tools may already be part of your jewellery setup.
Safety First: Important Torch-Use Basics
Working with a flame is not complicated, but it does require care. Always read your torch manufacturer's instructions and work in a well-ventilated area on a heat-safe surface. Keep flammable materials away from your bench.
- Wear eye protection.
- Tie back long hair and avoid loose sleeves.
- Use tweezers, not fingers, to hold wire near the flame.
- Keep your torch moving and stay focused on the tip of the wire.
- Allow hot metal to cool or quench appropriately before touching it.
Good safety habits not only protect you, they also improve your results. A stable, uncluttered setup makes it easier to hold the wire at the right angle and watch the metal closely as it forms a ball.
Step-by-Step: How to Make Balled Head Pins at Home
1. Cut your wire to length
Start by cutting the wire slightly longer than your finished head pin needs to be. You will lose a tiny bit of length when the end balls up, so give yourself extra room. It is often efficient to cut several pieces at once if you are making a batch.
2. Prepare the cut end
A clean cut usually works well, but if the end is very uneven, lightly file it so it melts more evenly. The neater the starting point, the more symmetrical the finished ball tends to be.
3. Grip the wire securely
Hold one piece of wire with cross-lock tweezers, leaving enough of the end exposed to form the ball. Position yourself so you can clearly see the wire tip and keep your hands stable.
4. Light the torch and adjust the flame
Use a small, controlled flame rather than a large aggressive one. A focused flame gives you better precision and reduces the chance of overheating the entire wire.
5. Heat the very tip of the wire
Bring the wire tip into the hottest part of the flame and keep the wire moving slightly. In a moment, the metal will begin to glow and gather into a rounded ball through surface tension. As soon as the ball forms, pull the wire out of the flame.
This is the critical moment: too little heat and the ball may be tiny or uneven; too much heat and the wire can distort, slump, or melt back further than intended.
6. Let it cool and inspect
After the wire cools or is quenched appropriately, inspect the ball. It should be centred, rounded, and proportionate to the wire gauge. If the ball is misshapen, set that piece aside as practice and make another. Consistency comes quickly with repetition.
7. Clean the metal
Depending on your metal, you may see oxidation or heat discolouration. Clean the pieces using your preferred process for that alloy. A light brushing or polishing can make a surprising difference in the final appearance.
8. Refine the opposite end
Use a cup bur or wire rounder on the non-balled end if needed. This creates a smooth end that is easier to loop and gentler on beads, especially softer materials or pearls.
How to Get Smooth, Professional Results
The difference between a homemade-looking head pin and a professional-looking one often comes down to consistency. Here are some practical ways to improve your finish.
Keep your wire lengths uniform
If you are making a pair of earrings or a matched set, measure carefully before torching. Slight length differences become much more noticeable once beads are added.
Use the same gauge throughout a project
Mixing wire gauges in one design can make components look mismatched unless that contrast is intentional. Uniform gauge usually creates a cleaner overall presentation.
Practice flame control
Most beginners either pull away too soon or heat for too long. Practise on copper until you can repeatedly form similar ball sizes. Torch control matters more than speed.
Work in batches
Making ten or twenty at a time often produces better results than making one at random. Your hand becomes more consistent when you repeat the same motion several times in a row.
Match ball size to bead scale
A tiny accent bead may look best with a delicate ball, while a larger gemstone drop can handle a more substantial finish. Proportion helps the piece look intentional rather than improvised.
Common Mistakes and How to Avoid Them
The wire melts too far back
This usually means the flame stayed on the wire too long or the torch was too hot. Use a smaller flame and remove the wire the instant the ball forms.
The ball is off-centre
An uneven cut end or inconsistent heating can cause this. Start with a cleaner cut and keep the tip positioned evenly in the hottest part of the flame.
The ball is too small
Some metals and gauges naturally form smaller balls, but if your results are consistently tiny, you may not be heating for long enough. A brief moment longer can help, but watch closely.
The surface looks dirty or rough
Oxidation and firescale can affect appearance, especially on sterling silver and copper. Proper cleaning, pickling, and gentle polishing will improve the finish.
The head pin breaks during shaping
If the wire has become brittle from repeated heating or overworking, use fresh wire and avoid unnecessary reheating. Form your loop with smooth, controlled motions.
Design Ideas for Handmade Balled Head Pins
Once you start making your own, you may find them useful in far more designs than expected. Their simplicity makes them versatile across many jewellery styles.
- Minimalist gemstone drop earrings
- Charm clusters on chain bracelets
- Rosary-inspired links between small faceted stones
- Pearl pendants with wrapped tops
- Layered necklace accents with mixed bead sizes
- Handmade findings paired with jump rings for custom charms
They also work beautifully with artisan aesthetics such as oxidised silver, hammered textures, and mixed-metal compositions. If you enjoy using natural stones, balled head pins can add a subtle handcrafted quality that complements the unique patterns of jasper, agate, quartz, and other bead materials.
In folklore and historical jewellery traditions, gemstones were often chosen not only for colour but also for symbolic meaning. For example, some makers use purple stones because they were traditionally associated with clarity or wisdom in older belief systems. When paired with handcrafted findings, these beads can feel especially meaningful and personal, while remaining grounded in design and tradition rather than modern claims.
When to Use Balled Head Pins Instead of Standard Head Pins
Standard flat head pins are useful, but balled head pins shine when you want a lighter, more elegant finish. They can look less mechanical and more integrated into the design, especially with rounded beads. They are a great choice when:
- You want a handmade, artisan appearance
- You need custom lengths not easily found pre-made
- You are working with smaller beads that suit a refined stopper
- You want your metalwork details to become part of the design
They are especially effective in earrings where every small detail is visible up close. A well-made balled head pin can subtly signal craftsmanship without overwhelming the focal bead.
Final Thoughts
Learning how to make professional balled head pins at home is a practical skill that can elevate your jewellery making in a noticeable way. With the right wire, a carefully controlled flame, and attention to finishing, you can create components that look polished, intentional, and beautifully suited to handmade work.
Do not worry if your first few attempts are imperfect. Like many bench skills, this technique improves rapidly through repetition. Start with practice wire, focus on consistency, and pay close attention to the moment when the metal forms its ball. Before long, you will be able to create custom head pins for gemstone earrings, charm links, pearl drops, and countless other designs.
For makers who enjoy designing with quality beads and findings, this is one of those foundational techniques that adds real versatility. And when paired with thoughtfully chosen materials from PebbleBead, handmade balled head pins can help your finished pieces look even more distinctive and refined.
Leave a Comment